How to Partition an Existing SQL Server Table
How to Partition an Existing SQL Server Table
As SQL Server databases grow, some tables can contain hundreds of millions—or even billions—of rows. Large tables can become increasingly difficult to maintain, archive, and query efficiently.
SQL Server table partitioning allows a large table or index to be divided into smaller logical units called partitions, while applications continue to access the object as a single table.
In this article, we will walk through a practical example of converting an existing non-partitioned SalesTransaction table into a table partitioned by TransactionDate.
We will cover:
- How SQL Server table partitioning works
- How to create partition filegroups
- How to create a partition function
- How to create a partition scheme
- How to create a new partitioned table
- How to migrate existing data
- How to validate partition distribution
- How partition elimination works
- Important production considerations and best practices
Important: Always test partitioning changes in a non-production environment before implementing them in production.
1. Understanding SQL Server Table Partitioning
Partitioning does not create multiple tables from the application’s perspective.
Applications still access one logical table:
dbo.SalesTransaction
Behind the scenes, SQL Server determines which partition contains each row based on the value of the partitioning column.
In our example, the partitioning column will be:
TransactionDate
The overall architecture looks like this:
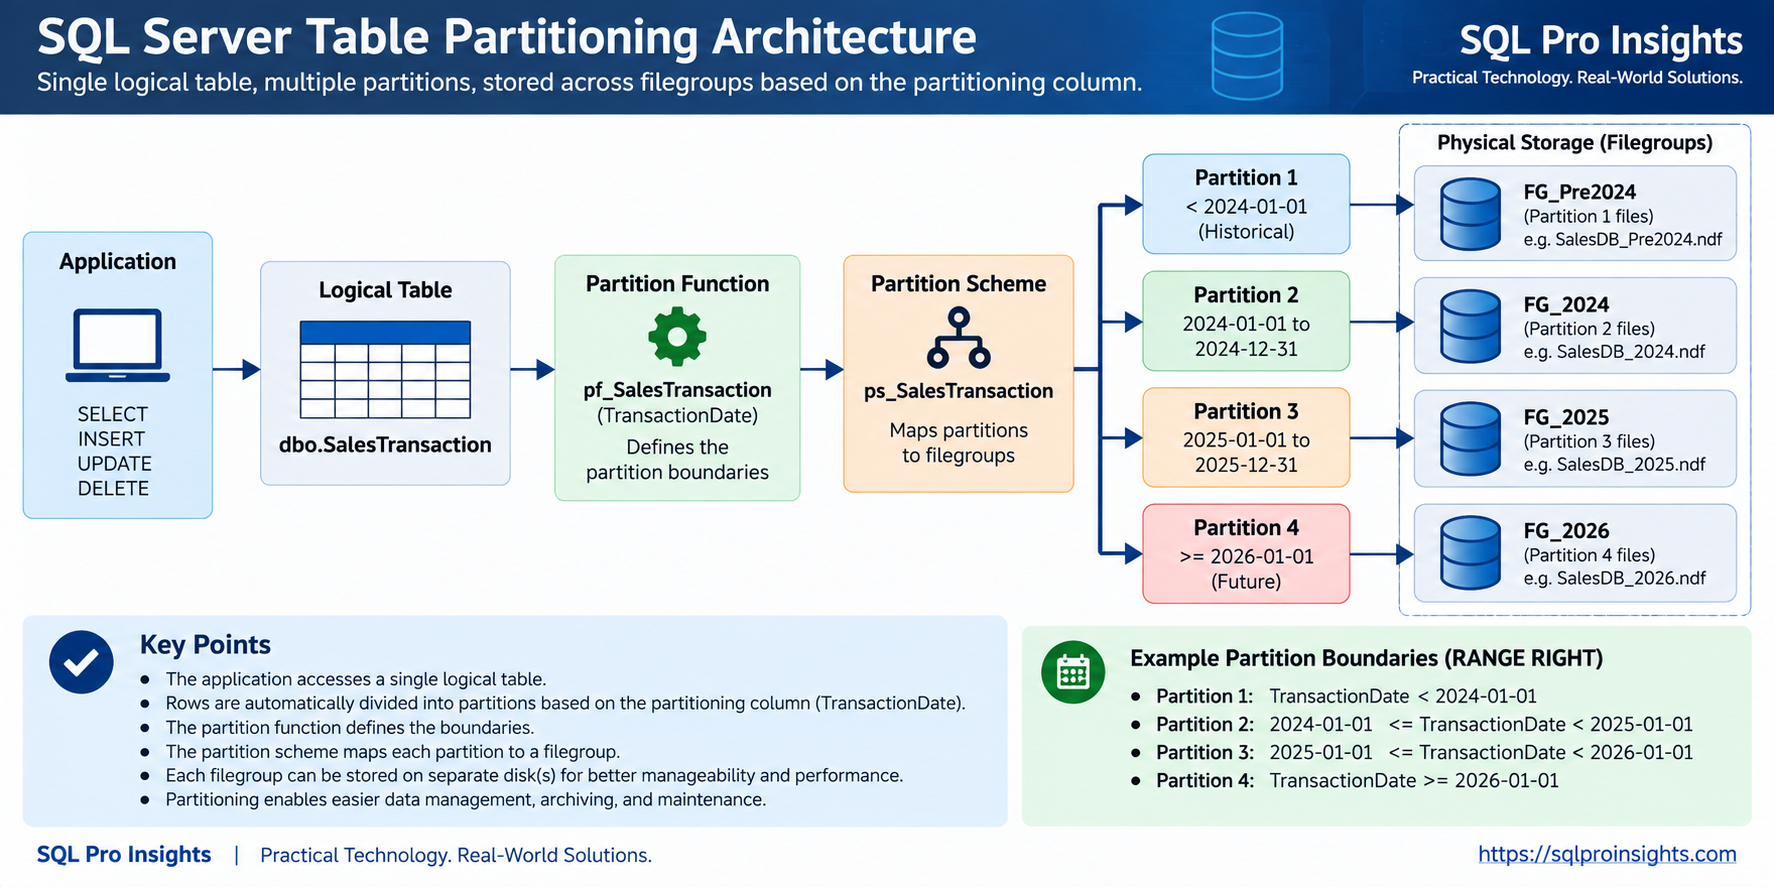
Figure 1: SQL Server table partitioning architecture.
The basic flow is:
Application
    ↓
dbo.SalesTransaction
    ↓
Partition Function
    ↓
Partition Scheme
    ↓
Partitions
    ↓
Filegroups
    ↓
Database Files
Why Partition a Large Table?
Partitioning can make very large tables easier to manage.
Common benefits include:
- Partition elimination for appropriately written queries
- Easier archival of historical data
- More manageable index maintenance
- Faster data loading and removal using partition switching
- Improved administration of very large tables
- Ability to distribute partitions across different filegroups
However, partitioning does not automatically make every query faster.
Performance still depends on:
- Index design
- Statistics
- Query predicates
- Partition boundaries
- Data distribution
- Execution plans
2. Existing SalesTransaction Table
Assume that our database contains the following table:
USE SalesDB;
GO

CREATE TABLE dbo.SalesTransaction
(
    TransactionID   BIGINT IDENTITY(1,1) NOT NULL,
    TransactionDate DATE NOT NULL,
    CustomerID      INT NOT NULL,
    ProductID       INT NOT NULL,
    Quantity        INT NOT NULL,
    UnitPrice       DECIMAL(18,2) NOT NULL,
    Amount AS (Quantity * UnitPrice) PERSISTED,

    CONSTRAINT PK_SalesTransaction
        PRIMARY KEY CLUSTERED (TransactionID)
);
GO
The table has accumulated several years of transaction data and currently resides on the PRIMARY filegroup.
We can verify the current storage location with:
SELECT
    t.name AS TableName,
    i.name AS IndexName,
    i.type_desc,
    ds.name AS DataSpaceName
FROM sys.tables AS t
JOIN sys.indexes AS i
    ON t.object_id = i.object_id
JOIN sys.data_spaces AS ds
    ON i.data_space_id = ds.data_space_id
WHERE t.name = 'SalesTransaction'
  AND i.index_id IN (0,1);
GO
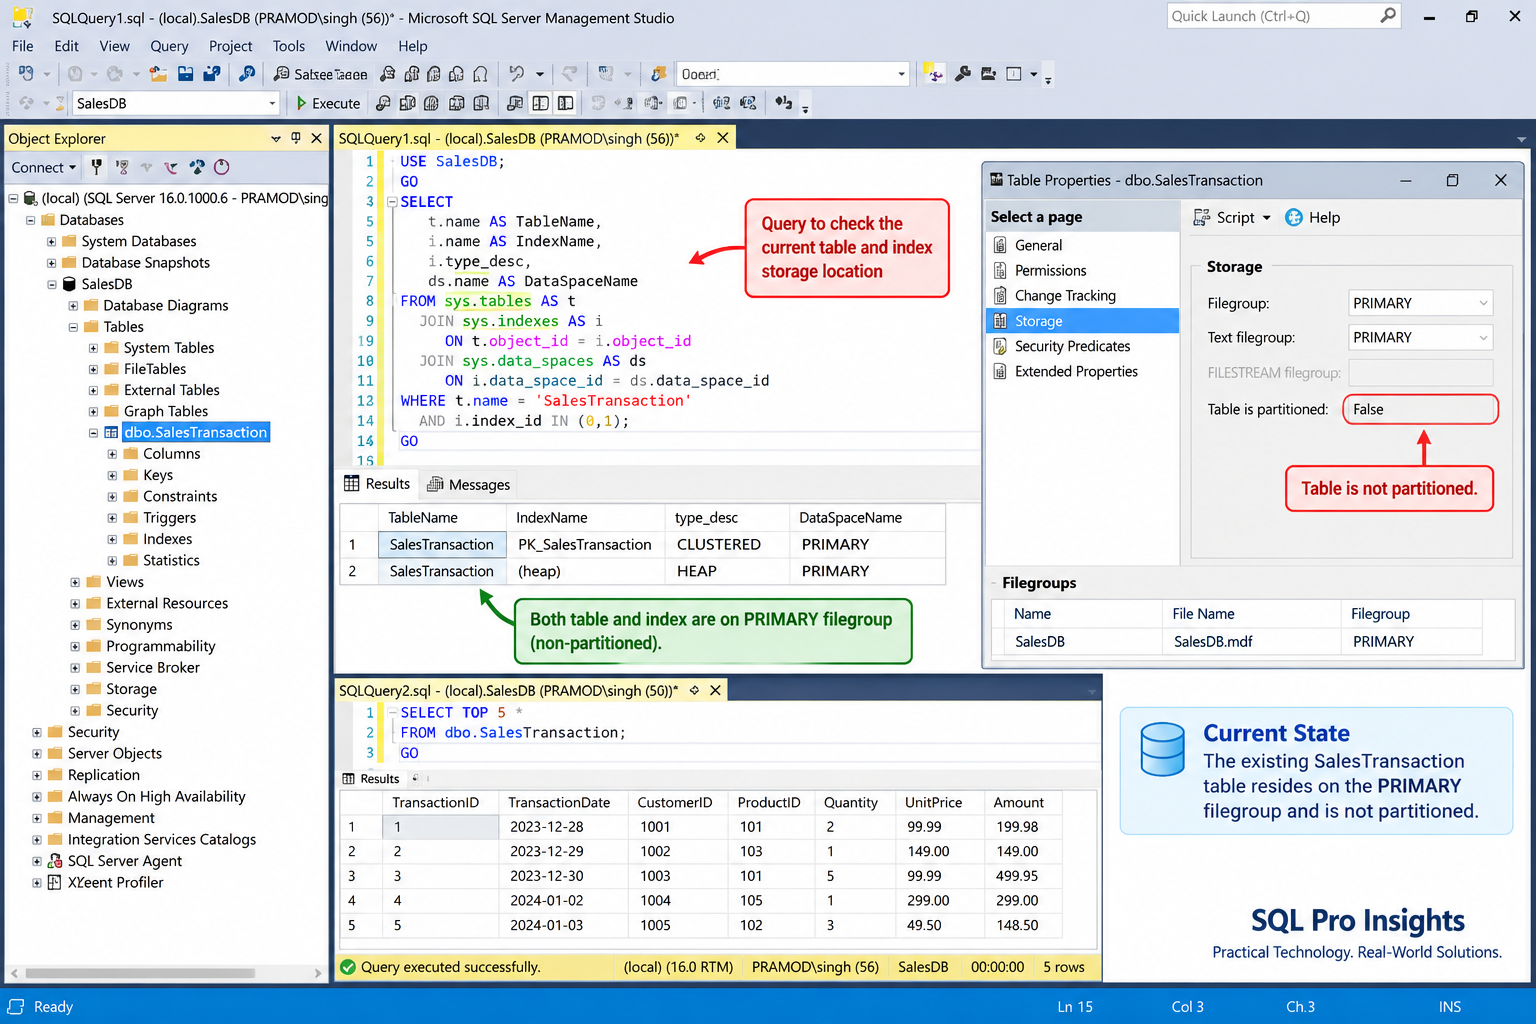
Figure 2: Existing SalesTransaction table before partitioning.
At this point:
- The table is not partitioned.
- Its clustered index resides on
PRIMARY. - All rows are stored together regardless of
TransactionDate.
3. Choose the Partitioning Strategy
Before creating anything, decide how the data should be divided.
For this example, we will partition the table by:
TransactionDate
We will use yearly boundaries.
Our target layout will be:
| Partition | TransactionDate Range | Filegroup |
|---|---|---|
| 1 | Before 2024-01-01 | FG_Pre2024 |
| 2 | 2024-01-01 through 2024-12-31 | FG_2024 |
| 3 | 2025-01-01 through 2025-12-31 | FG_2025 |
| 4 | 2026-01-01 and later | FG_2026 |
The correct partition granularity depends on your workload.
For some databases:
- Yearly partitions may be appropriate.
- Monthly partitions may be better.
- Daily partitions may make sense for extremely high-volume systems.
Partitioning should always be driven by data volume, retention requirements, and query patterns.
4. Create Filegroups for the Partitions
First, create filegroups to hold the partitions.
ALTER DATABASE SalesDB ADD FILEGROUP FG_Pre2024;
ALTER DATABASE SalesDB ADD FILEGROUP FG_2024;
ALTER DATABASE SalesDB ADD FILEGROUP FG_2025;
ALTER DATABASE SalesDB ADD FILEGROUP FG_2026;
GO
A filegroup must contain at least one database file before it can store data.
Example:
ALTER DATABASE SalesDB
ADD FILE
(
    NAME = N'SalesDB_Pre2024',
    FILENAME = N'D:\SQLData\SalesDB_Pre2024.ndf',
    SIZE = 1024MB,
    FILEGROWTH = 512MB
)
TO FILEGROUP FG_Pre2024;
GO

ALTER DATABASE SalesDB
ADD FILE
(
    NAME = N'SalesDB_2024',
    FILENAME = N'D:\SQLData\SalesDB_2024.ndf',
    SIZE = 1024MB,
    FILEGROWTH = 512MB
)
TO FILEGROUP FG_2024;
GO

ALTER DATABASE SalesDB
ADD FILE
(
    NAME = N'SalesDB_2025',
    FILENAME = N'D:\SQLData\SalesDB_2025.ndf',
    SIZE = 1024MB,
    FILEGROWTH = 512MB
)
TO FILEGROUP FG_2025;
GO

ALTER DATABASE SalesDB
ADD FILE
(
    NAME = N'SalesDB_2026',
    FILENAME = N'D:\SQLData\SalesDB_2026.ndf',
    SIZE = 1024MB,
    FILEGROWTH = 512MB
)
TO FILEGROUP FG_2026;
GO
Change the physical paths, initial sizes, and growth settings according to your environment.
You can verify the filegroups using:
SELECT
    fg.name AS FilegroupName,
    df.name AS LogicalFileName,
    df.physical_name,
    df.size / 128.0 AS SizeMB
FROM sys.filegroups AS fg
LEFT JOIN sys.database_files AS df
    ON fg.data_space_id = df.data_space_id
ORDER BY fg.name;
GO
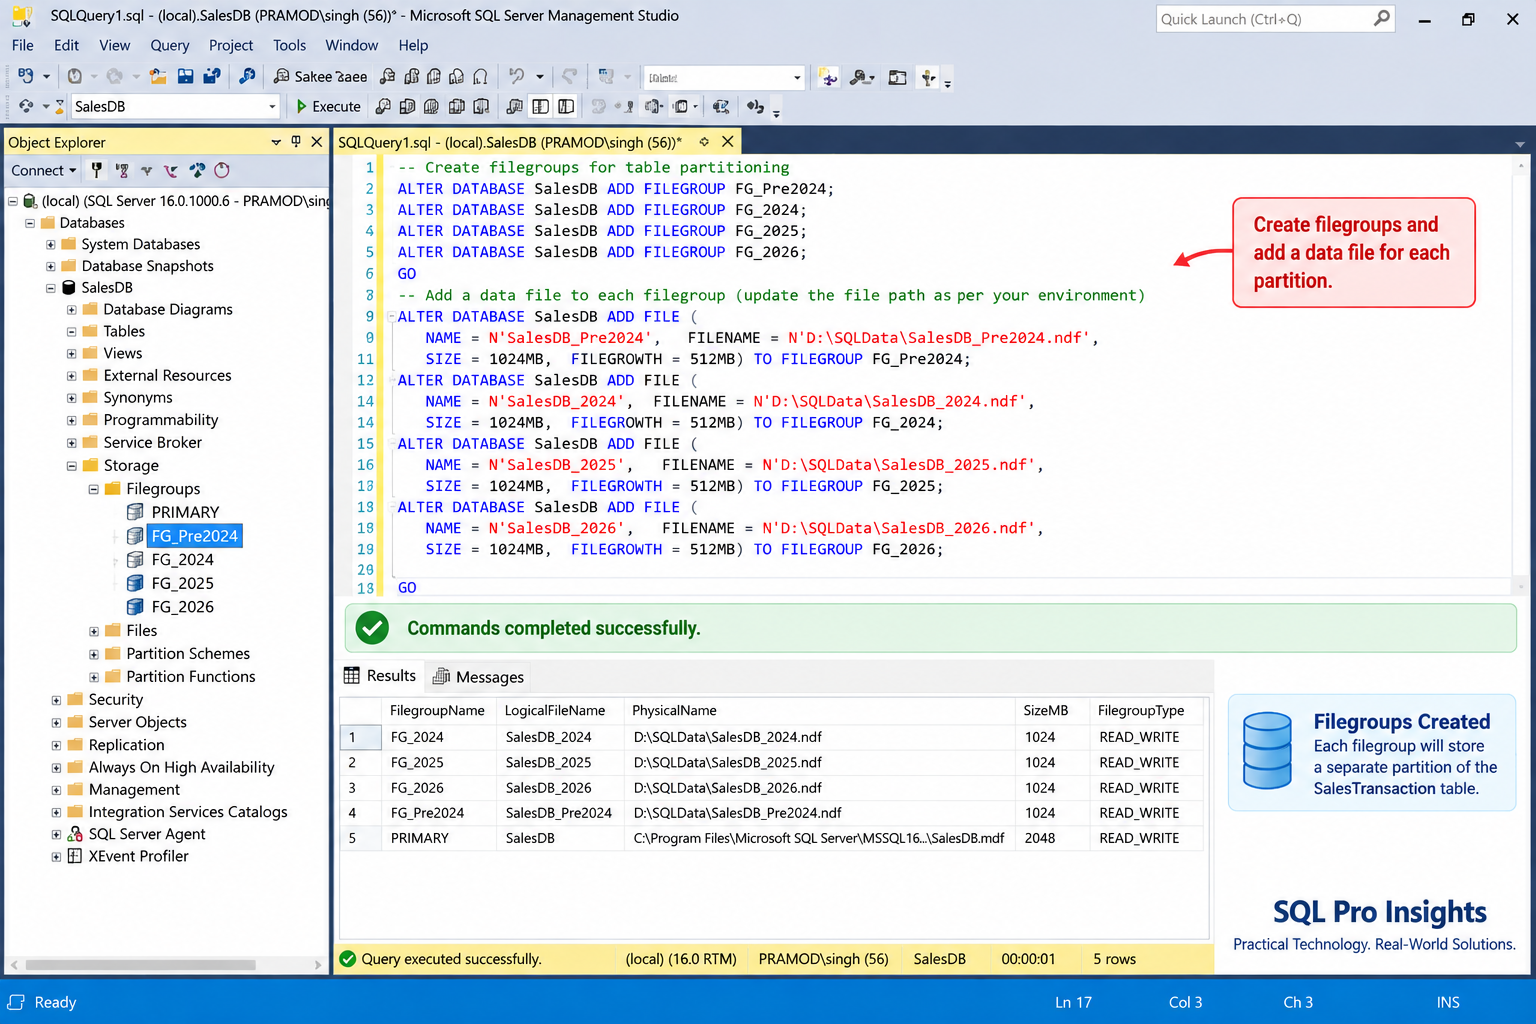
Figure 3: Filegroups created for the SalesTransaction partitions.
5. Create the Partition Function
The partition function defines the boundary values that determine which partition receives each row.
Create the partition function:
CREATE PARTITION FUNCTION pf_SalesTransaction (DATE)
AS RANGE RIGHT
FOR VALUES
(
    '2024-01-01',
    '2025-01-01',
    '2026-01-01'
);
GO
We are using:
RANGE RIGHT
With RANGE RIGHT, each boundary value belongs to the partition on its right.
That gives us:
Partition 1:
TransactionDate < 2024-01-01

Partition 2:
TransactionDate >= 2024-01-01
AND TransactionDate < 2025-01-01

Partition 3:
TransactionDate >= 2025-01-01
AND TransactionDate < 2026-01-01

Partition 4:
TransactionDate >= 2026-01-01
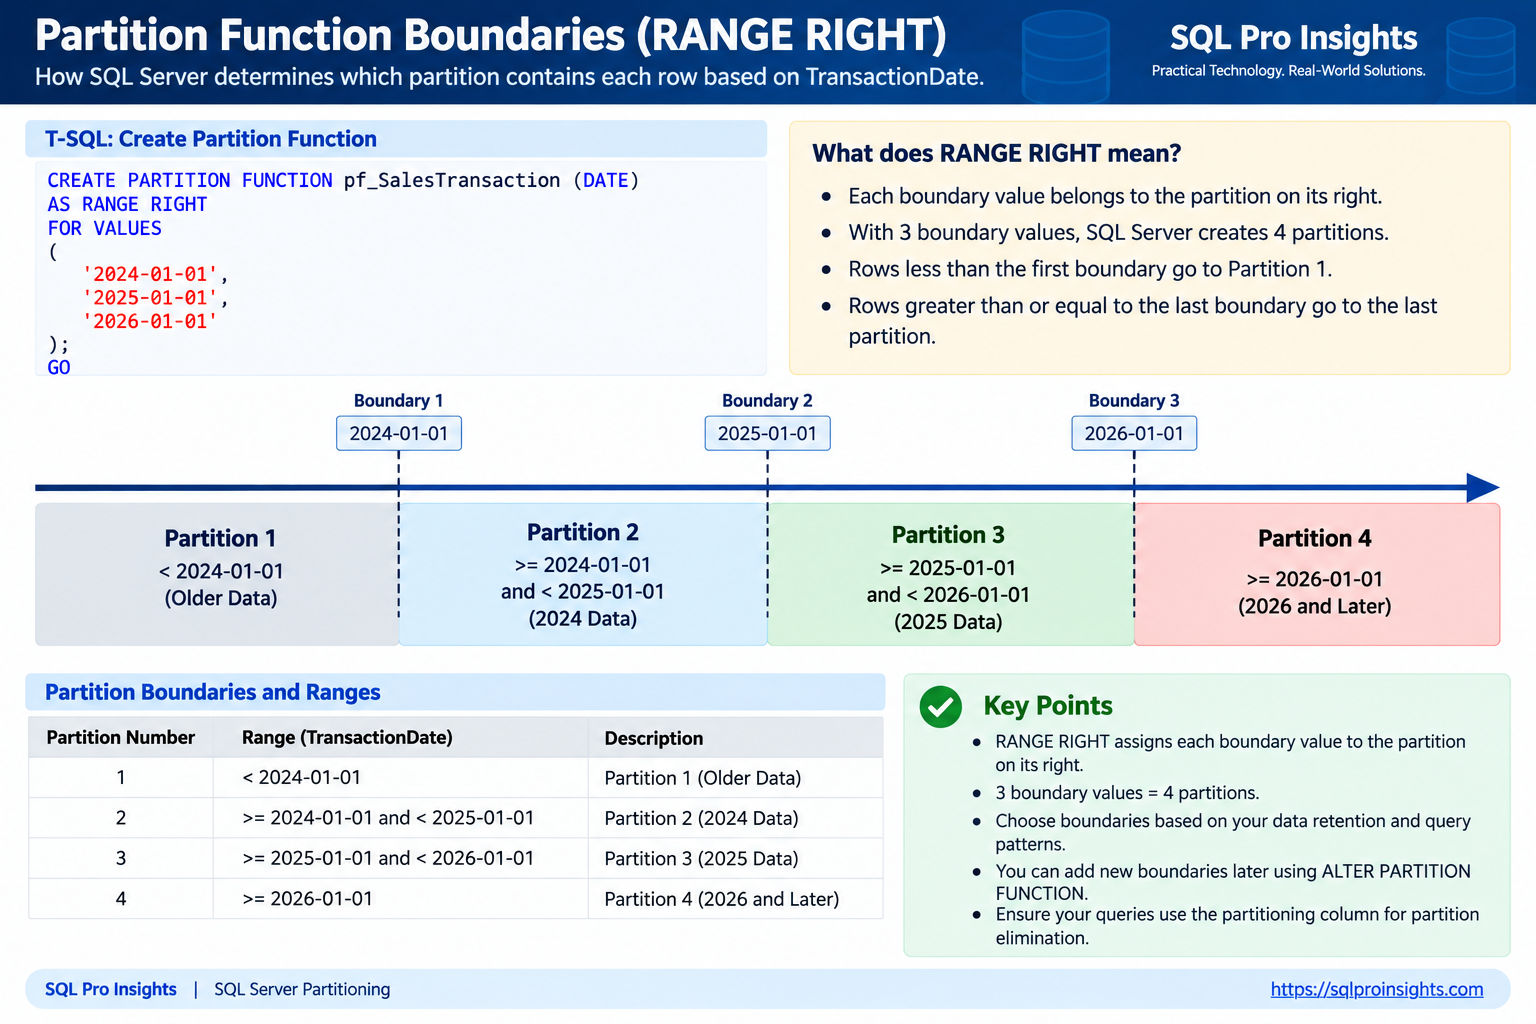
Figure 4: RANGE RIGHT partition boundaries.
Notice that three boundary values create four partitions.
You can inspect the function using:
SELECT
    pf.name AS PartitionFunction,
    prv.boundary_id,
    CONVERT(date, prv.value) AS BoundaryValue
FROM sys.partition_functions AS pf
JOIN sys.partition_range_values AS prv
    ON pf.function_id = prv.function_id
WHERE pf.name = 'pf_SalesTransaction'
ORDER BY prv.boundary_id;
GO
6. Create the Partition Scheme
The partition function answers:
Which partition should contain this row?
The partition scheme answers:
Which filegroup should store that partition?
Create the partition scheme:
CREATE PARTITION SCHEME ps_SalesTransaction
AS PARTITION pf_SalesTransaction
TO
(
    FG_Pre2024,
    FG_2024,
    FG_2025,
    FG_2026
);
GO
The relationship now looks like this:
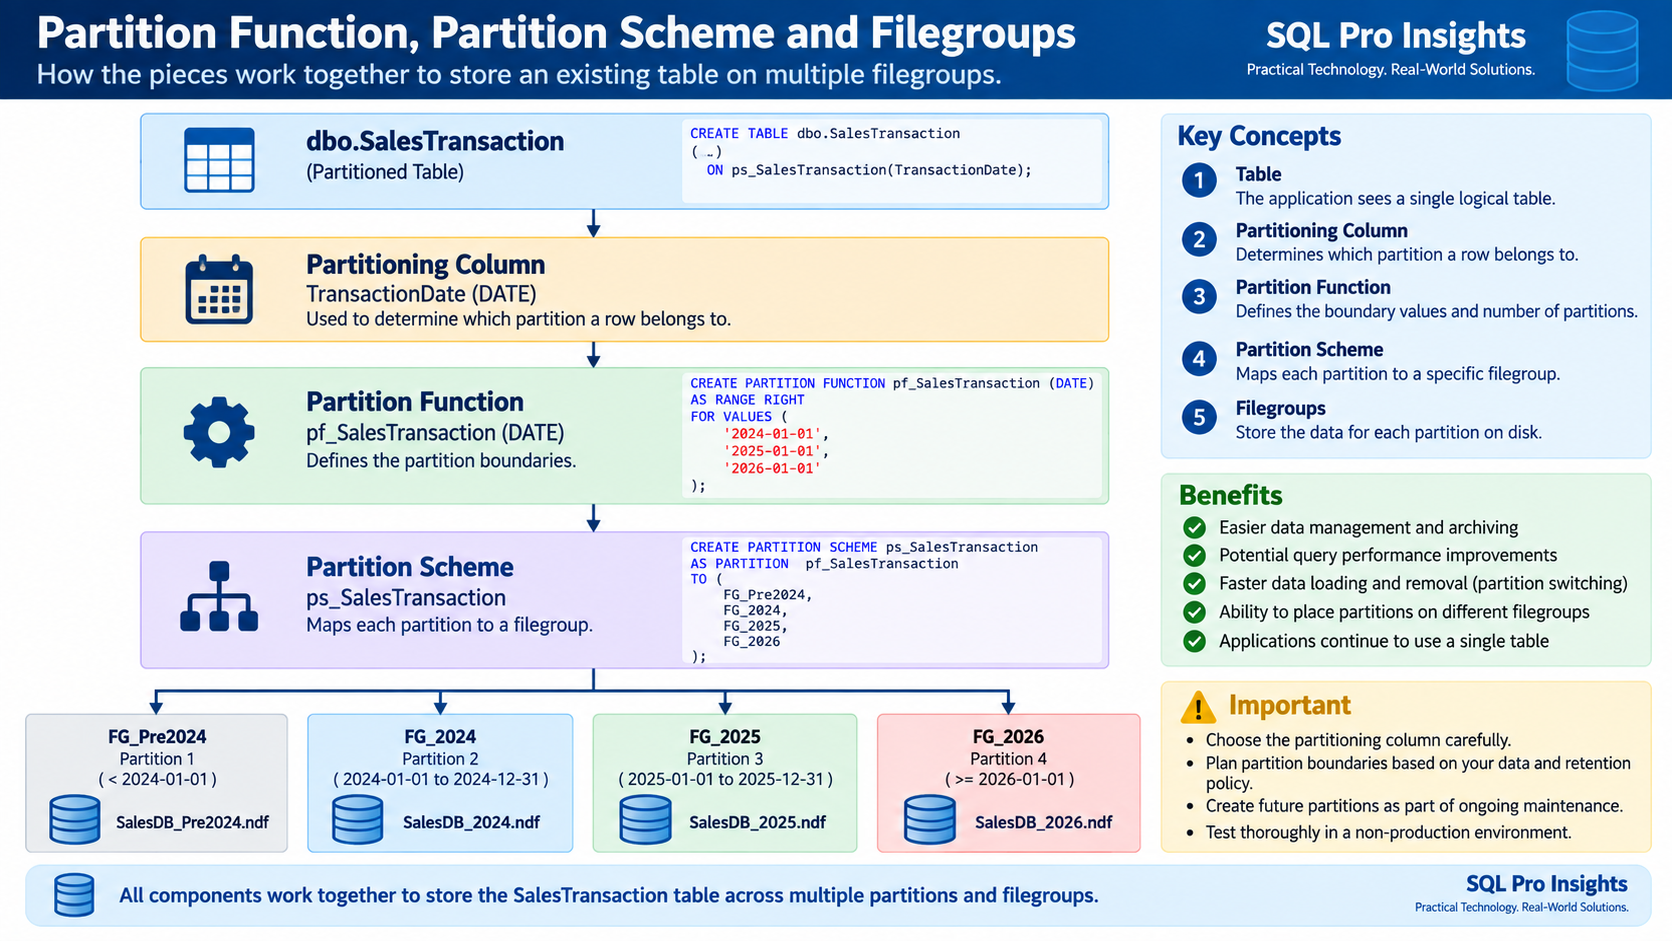
Figure 5: Relationship between the table, partition function, partition scheme, and filegroups.
The complete flow is:
SalesTransaction
       ↓
TransactionDate
       ↓
pf_SalesTransaction
       ↓
ps_SalesTransaction
       ↓
FG_Pre2024
FG_2024
FG_2025
FG_2026
Alternative: Partition the Existing Table In Place
Creating a new partitioned table and migrating the data is not the only approach. An existing table with a clustered index can also be moved onto a partition scheme by rebuilding or recreating the clustered index on the partition scheme.
The migration method demonstrated below is useful because it provides a separate destination table that can be validated before the final cutover. For some environments, however, repartitioning the existing clustered index may be a better option.
7. Create the New Partitioned Table
For this example, we will create a new partitioned table and then migrate the existing data.
There is one important indexing consideration.
For a unique partitioned index, SQL Server generally requires the partitioning column to be included in the unique index key.
Therefore, our clustered primary key will include:
TransactionDate
TransactionID
Create the new table:
CREATE TABLE dbo.SalesTransaction_Partitioned
(
    TransactionID   BIGINT IDENTITY(1,1) NOT NULL,
    TransactionDate DATE NOT NULL,
    CustomerID      INT NOT NULL,
    ProductID       INT NOT NULL,
    Quantity        INT NOT NULL,
    UnitPrice       DECIMAL(18,2) NOT NULL,
    Amount AS (Quantity * UnitPrice) PERSISTED,

    CONSTRAINT PK_SalesTransaction_Partitioned
        PRIMARY KEY CLUSTERED
        (
            TransactionDate,
            TransactionID
        )
)
ON ps_SalesTransaction(TransactionDate);
GO
The most important part is:
ON ps_SalesTransaction(TransactionDate)
This tells SQL Server to place the table’s clustered index on the partition scheme.
8. Migrate Existing Data
Before migrating, record the source row count:
SELECT COUNT_BIG(*) AS SourceRows
FROM dbo.SalesTransaction;
GO
Because the original table uses an identity column, use IDENTITY_INSERT while copying the data.
SET IDENTITY_INSERT dbo.SalesTransaction_Partitioned ON;
GO

INSERT INTO dbo.SalesTransaction_Partitioned
(
    TransactionID,
    TransactionDate,
    CustomerID,
    ProductID,
    Quantity,
    UnitPrice
)
SELECT
    TransactionID,
    TransactionDate,
    CustomerID,
    ProductID,
    Quantity,
    UnitPrice
FROM dbo.SalesTransaction;
GO

SET IDENTITY_INSERT dbo.SalesTransaction_Partitioned OFF;
GO
For a very large production table, copying all rows in a single operation may generate substantial:
- Transaction log usage
- I/O
- Blocking
- Replication traffic
- Availability Group traffic
For very large systems, consider alternatives such as:
- Batch migration
- Staging tables
- Partition switching
- Controlled maintenance windows
- Incremental synchronization
- Proper transaction log planning
9. Validate the Migration
Never replace the original table immediately after copying the data.
First, compare row counts:
SELECT
    (SELECT COUNT_BIG(*)
     FROM dbo.SalesTransaction) AS OriginalRows,

    (SELECT COUNT_BIG(*)
     FROM dbo.SalesTransaction_Partitioned) AS PartitionedRows;
GO
The counts should match.
Also compare business totals.
For example:
SELECT
    YEAR(TransactionDate) AS SalesYear,
    COUNT_BIG(*) AS RowCount,
    SUM(Amount) AS TotalAmount
FROM dbo.SalesTransaction
GROUP BY YEAR(TransactionDate)
ORDER BY SalesYear;
GO
Run the same query against:
dbo.SalesTransaction_Partitioned
and compare the results.
10. Verify Row Distribution Across Partitions
SQL Server provides the $PARTITION function, which makes it easy to determine which partition contains a row.
Run:
SELECT
    $PARTITION.pf_SalesTransaction(TransactionDate)
        AS PartitionNumber,
    MIN(TransactionDate) AS MinDate,
    MAX(TransactionDate) AS MaxDate,
    COUNT_BIG(*) AS RowCount
FROM dbo.SalesTransaction_Partitioned
GROUP BY
    $PARTITION.pf_SalesTransaction(TransactionDate)
ORDER BY
    PartitionNumber;
GO
You may see output similar to:
PartitionNumber   MinDate      MaxDate      RowCount
---------------   ----------   ----------   ---------
1                 2020-01-01   2023-12-31   1,245,678
2                 2024-01-01   2024-12-31   2,341,892
3                 2025-01-01   2025-12-31   2,876,445
4                 2026-01-01   2026-08-31   1,102,334
You can also check individual rows:
SELECT TOP 20
    TransactionID,
    TransactionDate,
    CustomerID,
    ProductID,
    Amount,
    $PARTITION.pf_SalesTransaction(TransactionDate)
        AS PartitionNumber
FROM dbo.SalesTransaction_Partitioned
ORDER BY TransactionDate;
GO
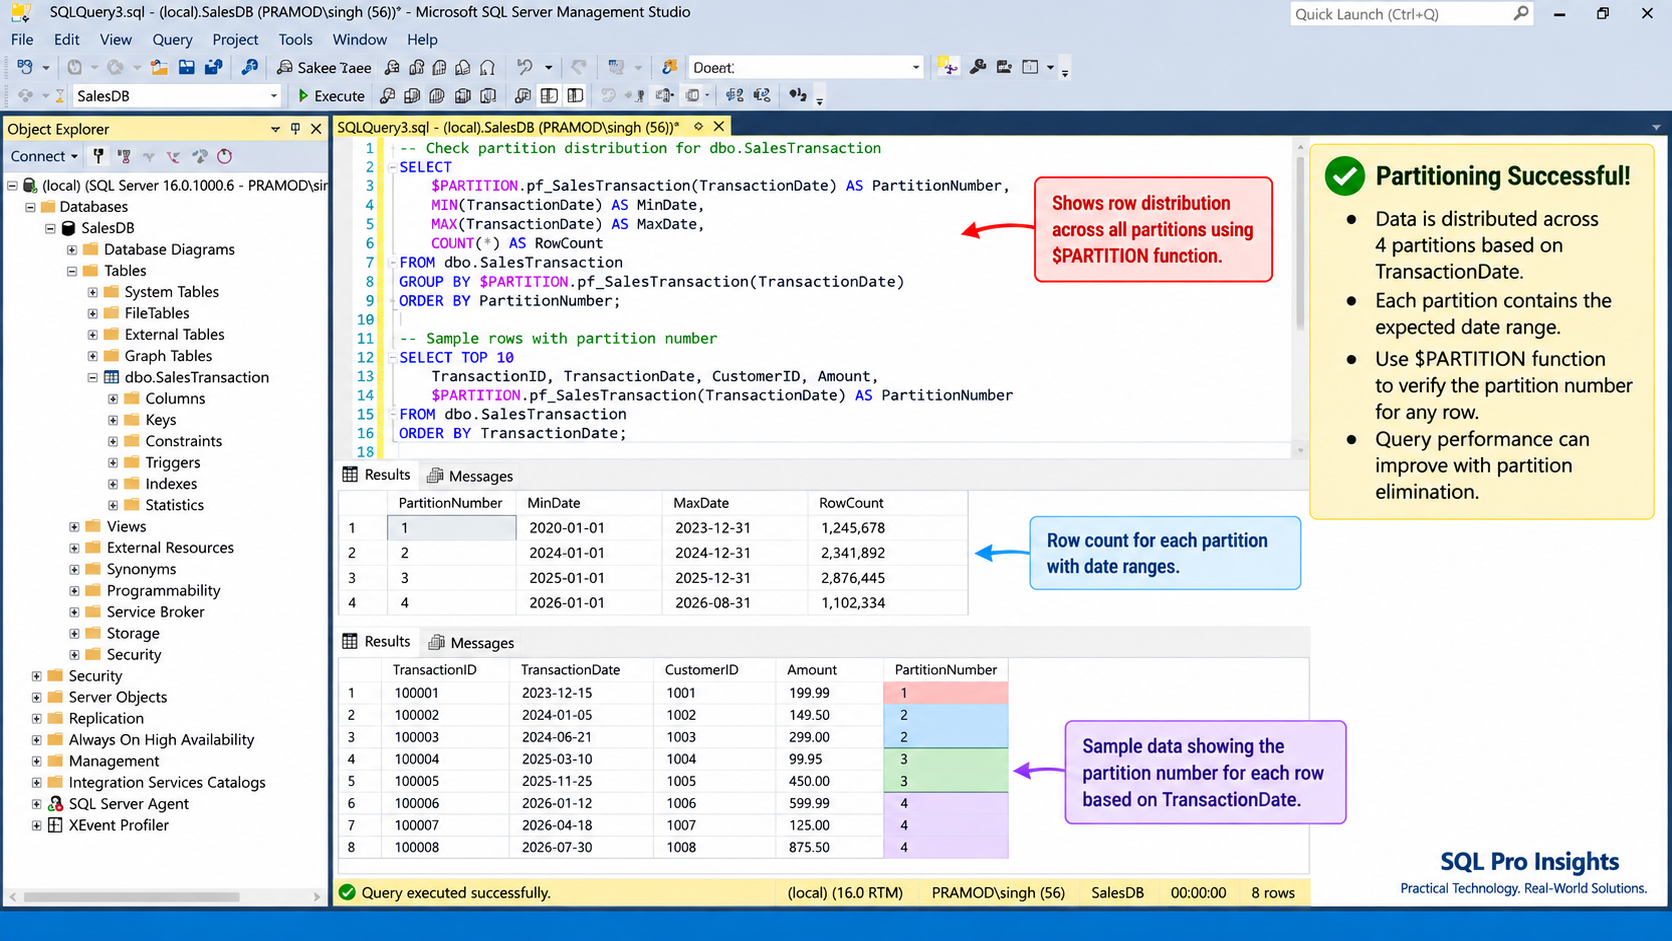
Figure 6: Verifying row distribution across SQL Server partitions.
11. Verify Filegroup Mapping
We can also inspect the SQL Server catalog views to determine where each partition is stored.
SELECT
    p.partition_number,
    p.rows,
    fg.name AS FilegroupName
FROM sys.partitions AS p
JOIN sys.indexes AS i
    ON p.object_id = i.object_id
   AND p.index_id = i.index_id
JOIN sys.destination_data_spaces AS dds
    ON i.data_space_id = dds.partition_scheme_id
   AND p.partition_number = dds.destination_id
JOIN sys.filegroups AS fg
    ON dds.data_space_id = fg.data_space_id
WHERE p.object_id =
      OBJECT_ID('dbo.SalesTransaction_Partitioned')
  AND i.index_id = 1
ORDER BY p.partition_number;
GO
Expected mapping:
Partition 1 → FG_Pre2024
Partition 2 → FG_2024
Partition 3 → FG_2025
Partition 4 → FG_2026
12. Partition Elimination
One of the most useful potential performance benefits of partitioning is partition elimination.
Suppose we want only 2025 transactions:
SELECT
    TransactionID,
    TransactionDate,
    CustomerID,
    ProductID,
    Quantity,
    UnitPrice
FROM dbo.SalesTransaction_Partitioned
WHERE TransactionDate >= '2025-01-01'
  AND TransactionDate <  '2026-01-01';
GO
Because the query filters directly on the partitioning column and matches our partition boundaries, SQL Server can potentially eliminate partitions that cannot contain qualifying rows.
Without an appropriate filter:
Partition 1
Partition 2
Partition 3
Partition 4
may all need to be considered.
With the 2025 predicate:
Partition 3
is the relevant partition.
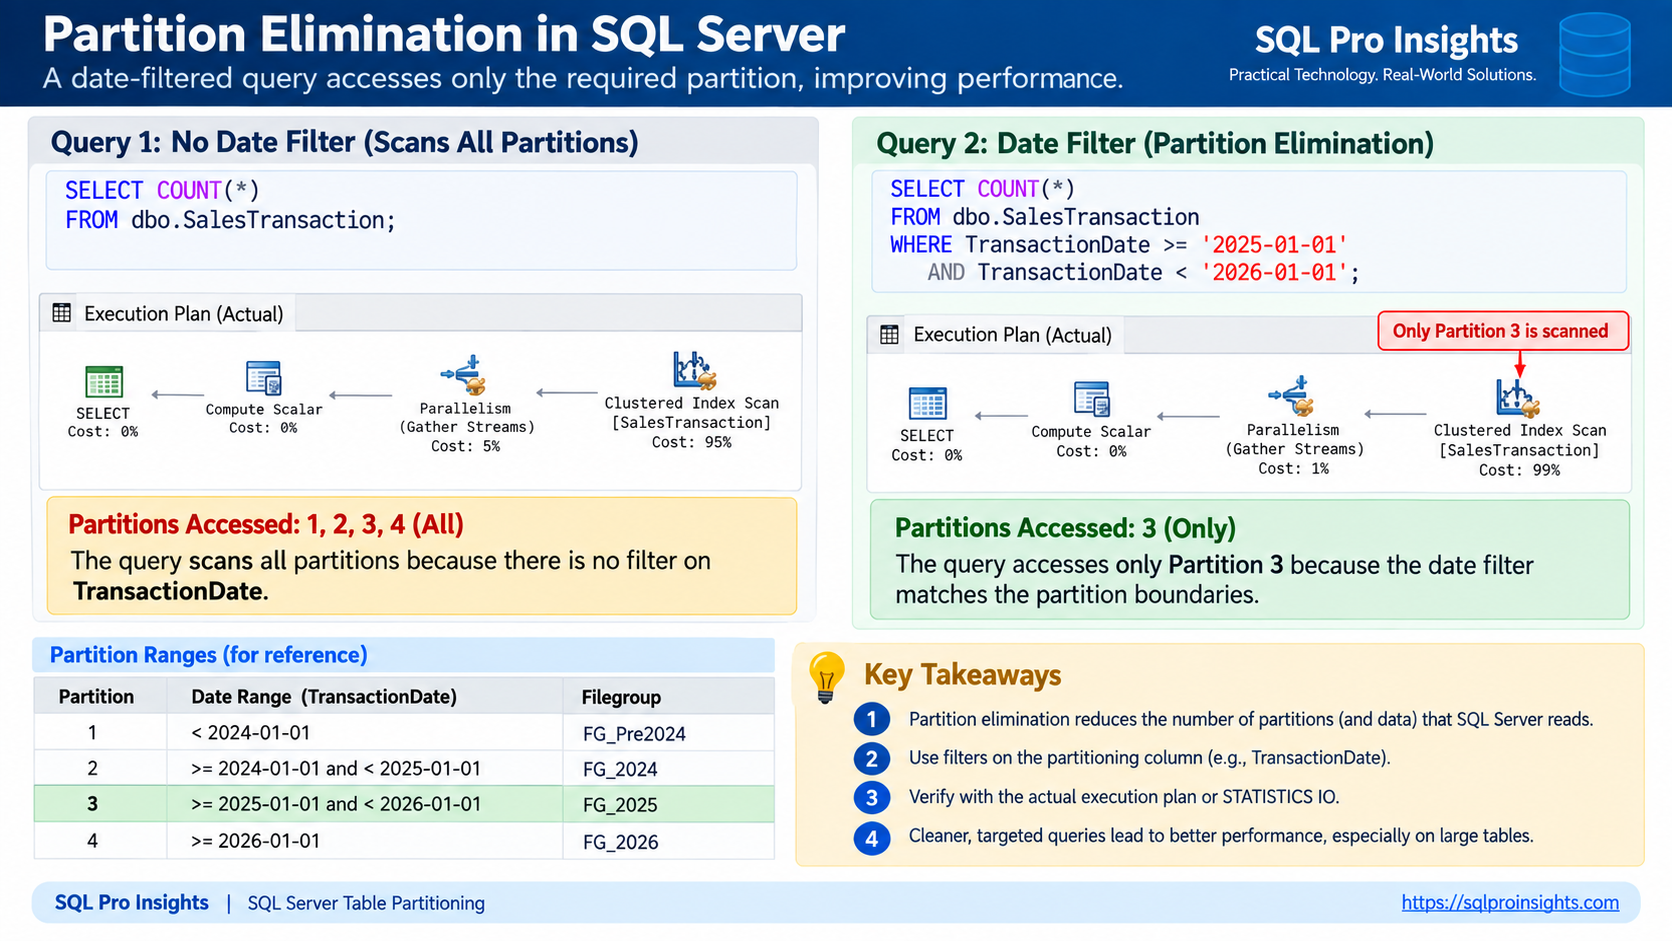
Figure 7: Partition elimination allows SQL Server to avoid unnecessary partitions.
Always verify actual behavior using:
- Actual Execution Plan
SET STATISTICS IO ON- Runtime statistics
Do not assume partition elimination occurred simply because the table is partitioned.
13. Prepare Future Partitions
Partitioned tables require ongoing maintenance.
Before future data arrives, create appropriate future filegroups and boundaries.
For example, create a filegroup for 2027:
ALTER DATABASE SalesDB
ADD FILEGROUP FG_2027;
GO
Add its data file:
ALTER DATABASE SalesDB
ADD FILE
(
    NAME = N'SalesDB_2027',
    FILENAME = N'D:\SQLData\SalesDB_2027.ndf',
    SIZE = 1024MB,
    FILEGROWTH = 512MB
)
TO FILEGROUP FG_2027;
GO
Tell the partition scheme to use that filegroup next:
ALTER PARTITION SCHEME ps_SalesTransaction
NEXT USED FG_2027;
GO
Then split the partition function:
ALTER PARTITION FUNCTION pf_SalesTransaction()
SPLIT RANGE ('2027-01-01');
GO
Now SQL Server has a separate destination for 2027 data.
14. Sliding Window Partitioning
Large databases often use a sliding window strategy.
The concept is:
Oldest Partition
      ↓
Archive / Switch Out

Active Partitions
      ↓
Normal Workload

Future Empty Partition
      ↓
Ready for New Data
A sliding-window strategy can make it easier to:
- Remove old data
- Archive historical data
- Add new periods
- Avoid large DELETE operations
- Maintain predictable partition boundaries
This is particularly useful for:
- Audit data
- Logging systems
- Financial transactions
- Sales systems
- Data warehouses
- Telemetry databases
15. Switching to the New Table
After validating the partitioned table, you can plan the final production cutover.
A simplified example is:
BEGIN TRANSACTION;
GO

EXEC sp_rename
    'dbo.SalesTransaction',
    'SalesTransaction_Old';
GO

EXEC sp_rename
    'dbo.SalesTransaction_Partitioned',
    'SalesTransaction';
GO

COMMIT TRANSACTION;
GO
However, table renaming alone should not be considered a complete production migration strategy.
Before cutover, inventory:
- Foreign keys
- Nonclustered indexes
- Check constraints
- Default constraints
- Triggers
- Permissions
- Views
- Stored procedures
- Functions
- Synonyms
- Replication
- Change Data Capture
- Change Tracking
- Application dependencies
You should also document a rollback plan before changing the production table.
16. Index Considerations
Partitioning and indexing need to be designed together.
For partition management operations such as partition switching, aligned indexes are often preferred.
An aligned index uses the same partition scheme as the table.
For example:
CREATE INDEX IX_SalesTransaction_CustomerID
ON dbo.SalesTransaction_Partitioned
(
    CustomerID,
    TransactionDate
)
ON ps_SalesTransaction(TransactionDate);
GO
Whether every index should be aligned depends on the workload.
There are cases where a non-aligned index may be appropriate, but it can complicate partition-management operations.
17. Common Partitioning Mistakes
Choosing the Wrong Partitioning Column
If queries rarely filter on the partitioning column, partition elimination may provide limited performance benefit.
Creating Too Many Partitions
More partitions are not automatically better.
Thousands of unnecessary partitions can increase administrative complexity.
Forgetting Future Boundaries
If no new boundaries are created, future rows accumulate in the last partition.
Ignoring Index Design
Partitioning does not replace indexing.
A poorly indexed partitioned table can still perform poorly.
Assuming Partitioning Automatically Improves Performance
Partitioning is primarily a data-management architecture.
Performance improvement depends on:
Partitioning
+
Indexing
+
Statistics
+
Good Query Design
Performing Large SPLIT Operations on Populated Partitions
Splitting a heavily populated partition may cause significant data movement and transaction-log activity.
Ideally, maintain empty partitions at the ends of the partition range.
18. When Should You Consider Partitioning?
Good candidates are usually very large tables with a predictable data lifecycle.
Examples include:
- Sales transactions
- Audit tables
- Application logs
- Financial transactions
- Telemetry data
- Data warehouse fact tables
- Historical reporting tables
A table being large is not, by itself, enough reason to partition it.
There should be a clear objective such as:
- Faster archival
- Easier maintenance
- Partition switching
- Reduced maintenance scope
- Data lifecycle management
- Partition elimination for common queries
19. Final Verification Checklist
Before considering the migration complete, verify:
- Source and destination row counts match
- Business totals match
- Partition boundaries are correct
- Rows are distributed into expected partitions
- Filegroup mapping is correct
- Required indexes exist
- Indexes are aligned where required
- Constraints have been recreated
- Foreign keys have been handled
- Triggers have been recreated
- Permissions have been validated
- Statistics are current
- Application testing has completed
- Execution plans show expected partition elimination
- Backup and recovery procedures have been reviewed
- Future partition maintenance is scheduled
- Rollback procedure is documented
Conclusion
Partitioning an existing SQL Server table requires more than simply creating a partition function.
A complete partitioning design includes:
Partitioning Column
        ↓
Partition Function
        ↓
Partition Scheme
        ↓
Filegroups
        ↓
Partitioned Table / Index
        ↓
Data Migration
        ↓
Validation
        ↓
Ongoing Partition Maintenance
In this example, we converted the existing SalesTransaction table into a structure partitioned by TransactionDate.
The most important point is that partitioning should solve a specific performance or data-management problem.
When designed correctly, SQL Server table partitioning can make very large tables significantly easier to maintain, archive, load, and manage.
SQL Pro Insights Practical Technology. Real-World Solutions.